
Hide Data in Image, Audio and Video Files: Steganography

What is Steganography?
Steganography is a means of obscuring
data where secret messages are hidden inside computer files such as
images, sound files, videos and even executable files so that, no one
except the sender and the receiver will suspect the existence of stealth
information in it. Steganography may also involve the usage of cryptography
where the message is first encrypted before it is concealed in another
file. Generally, the messages appear to be something else such as an
image, sound or video so that the transfer of secret data remains
unsuspected.
The main advantage of steganography
over other methods such as cryptography is that, it will not arose
suspicion even if the files fall in the hands of a third party. Unlike
cryptographic messages, stegnographic messages will no way attract the
attention of a third party by themselves. Thus stegnanography has an
upper hand over cryptography as it involves both encryption and
obscurity.
What are the Applications of Steganography?
Steganography is mainly used to obscure
confidential information/data during storage or transmission. For
example, one can hide a secret message in an audio file and send this to
another party via email instead of sending the message in the textual
format. The receiver on the other end will decrypt the hidden message
using the private decryption key. In a worst case scenario, even if
a third party does manage to gain access to the email, all he can find
is the audio file and not the hidden data inside it. Other usage of
steganography include digital watermarking of images for reasons such as
copyright protection.
Even though steganography has many
useful applications, some may use this technique for illegitimate
purposes such as hiding a pornographic content in other large files.
Rumors about terrorists using steganography for hiding and communicating
their secret information and instructions are also reported. An article
claiming that, al-Queda had used steganography to encode messages in
images and transported them via e-mails, was reported by New York Times,
in October 2001.
How do Steganography Tools Work?
Stegnography tools implement intelligent
algorithms to carefully embed the encrypted text messages or
data inside other larger files such as an image, audio, video or an
executable file. Some tools will embed the encrypted data at the end
of another file so that there will be enough room for storing larger
data.
There are many steganography tools
available online but only a few are able to work flawlessly. I did not
find any tool that worked perfectly on both small and large
data. However, I have managed to develop my own tool that can work
perfectly on all types of files and all size of data. The tool is called
“Stego Magic“. You can download it from the following link.
The zip file contains two versions of Stego Magic: One for encrypting the text messages and the other for encrypting binary files. StegoMagic_TXT can be used to hide text messages in other files such as an image or a sound file. StegoMagic_BIN can be used to hide one binary file in another such as an executable file inside an image or an image inside a video file.
With Stego Magic, there is no
limitation on the size and type of the file that you are intending to
hide. For example, you can hide a video of size 1 GB in an image of size
1 MB or hide an executable file inside a WORD document. The tool is
pretty straightforward to use and requires no special understanding of
the concept.
At the end of the encryption process, a
secret decryption key will be generated and the same is required during
the decryption process.
How to Use Stego Magic?
Suppose you want to hide a text message inside a JPG file:
-
Place the JPG and the text file (.txt) in the same folder as that of StegoMagic_TXT.exe
-
Run StegoMagic_TXT.exe and follow the screen instructions to embed the text message inside the JPG image.Please note that if you’re using Windows 7/Vista, right-click the file and select “Run as Administrator”. Otherwise the tool may fail to work properly.
-
Note down the secret decryption key.
Now you can send this image to your
friend via email. To decrypt the hidden message, your friend should load
this JPG file onto the Stego Magic tool and use the secret decryption key.
I hope you’ve now understood what is
steganography and how to use it to hide your secret data. For queries
and feedback, please pass your comments.
10 Good Star(*) Pattern C Programs !
10 Good Star(*) Pattern C Programs !

* * * * * * * * * * * * * * * * * * * * * * * * * * * * ** * * * * * * * * * * * * * * * * * * * * * * * * * * * ** * * * * * * * * * * * * * * * * * * * * * * * * * * * ** * * * * * * * * * * * * * * * * * * * * * * * * * * * * * * * * * * * * * * * * * * * * * * * ** * * * * * * * * * * * * * * ** * * * * * * * * * * * * * * * * * * * * * * * * * * * * * * * * * * * * * * * * * * * * * * * * * * * * * * ** * * * * * * * * * * * * * * * * * * * * * * * * * * * * * * * * * * * * * * * * * * * * * * * * * * * * * * * * * * * * * * * * * * * * * * ** * * * * * * * * * * * * * * * * * * * * * * * * * * * * * * * * * * * * * * * * * * * * * * * * * * * * * * * * * * * * * ** * * * * * * * * * * * * * * * * * * * * * * * * * * * * * * * * * * * * * * * * * * * * * * * * * * * * * * * * * * * * * * * * * * * * * * * * * * * * * * * * * * * * * * * *
*
* *
* * *
* * * *
Program:
/* This is a simple mirror-image of a right angle triangle */

#include
int main() {
 char prnt = '*';
 int i, j, nos = 4, s;
 for (i = 1; i <= 5; i++) { for (s = nos; s >= 1; s--) {  // Spacing factor
   printf("  ");
  }
  for (j = 1; j <= i; j++) {
   printf("%2c", prnt);
  }
  printf("\n");
  --nos;   // Controls the spacing factor
 }
 return 0;
}
Program:
#include
int main() {
 char prnt = '*';
 int i, j, k, s, c = 1, nos = 9;
 for (i = 1; c <= 4; i++) {
     // As we want to print the columns in odd sequence viz. 1,3,5,.etc
  if ((i % 2) != 0) {
   for (j = 1; j <= i; j++) {  printf("%2c", prnt); } for (s = nos; s >= 1; s--) { //The spacing factor
    if (c == 4 && s == 1) {
     break;
    }
    printf("  ");
   }
   for (k = 1; k <= i; k++) {
    if (c == 4 && k == 5) {
     break;
    }
    printf("%2c", prnt);
   }
   printf("\n");
   nos = nos - 4;  // controls the spacing factor
   ++c;
  }
 }
 return 0;
}
Program:
#include
int main() {
 char prnt = '*';
 int i, j, k, s, p, r, nos = 7;

 for (i = 1; i <= 5; i++) {
  for (j = 1; j <= i; j++) {  if ((i % 2) != 0 && (j % 2) != 0) { printf("%3c", prnt); } else if ((i % 2) == 0 && (j % 2) == 0) { printf("%3c", prnt); } else { printf("   "); } } for (s = nos; s >= 1; s--) {  // for the spacing factor
   printf("   ");
  }
  for (k = 1; k <= i; k++) { //Joining seperate figures if (i == 5 && k == 1) {  continue; } if ((k % 2) != 0) { printf("%3c", prnt); } else { printf("   "); } } printf("\n"); nos = nos - 2;   // space control }  nos = 1;  // remaining half.. for (p = 4; p >= 1; p--) {
  for (r = 1; r <= p; r++) { if ((p % 2) != 0 && (r % 2) != 0) { printf("%3c", prnt); } else if ((p % 2) == 0 && (r % 2) == 0) { printf("%3c", prnt); } else { printf("   "); } } for (s = nos; s >= 1; s--) {
   printf("   ");
  }
  for (k = 1; k <= p; k++) {
   if ((k % 2) != 0) {
    printf("%3c", prnt);
   }
else {
    printf("   ");
   }
  }
  nos = nos + 2;  // space control
  printf("\n");
 }
 return 0;
}
Program:
#include
int main() {
 char prnt = '*';
 int i, j, s, nos = 0;
 for (i = 9; i >= 1; (i = i - 2)) {
  for (s = nos; s >= 1; s--) {
   printf("  ");
  }
  for (j = 1; j <= i; j++) {
   if ((i % 2) != 0 && (j % 2) != 0) {
    printf("%2c", prnt);
   } else {
    printf("  ");
   }
  }
  printf("\n");
  nos++;
 }
 nos = 3;
 for (i = 3; i <= 9; (i = i + 2)) { for (s = nos; s >= 1; s--) {
   printf("  ");
  }
  for (j = 1; j <= i; j++) {

   if ((i % 2) != 0 && (j % 2) != 0) {
    printf("%2c", prnt);
   } else {
    printf("  ");
   }
  }
  nos--;
  printf("\n");
 }
 return 0;
}
Program:
#include
int main() {
 char prnt = '*';
 int i, j, k, s, nos = 4;
 for (i = 1; i <= 5; i++) { for (s = nos; s >= 1; s--) {
   printf("  ");
  }
  for (j = 1; j <= i; j++) {
   printf("%2c", prnt);
  }
  for (k = 1; k <= (i - 1); k++) { if (i == 1) {     continue; } printf("%2c", prnt); }  printf("\n");   nos--; }  nos = 1; for (i = 4; i >= 1; i--) {
  for (s = nos; s >= 1; s--) {
   printf("  ");
  }
  for (j = 1; j <= i; j++) {
   printf("%2c", prnt);
  }
  for (k = 1; k <= (i - 1); k++) {
   printf("%2c", prnt);
  }
  nos++;
  printf("\n");
 }
 nos = 3;
 for (i = 2; i <= 5; i++) { if ((i % 2) != 0) { for (s = nos; s >= 1; s--) {
    printf("  ");
   }
   for (j = 1; j <= i; j++) {
    printf("%2c", prnt);
   }
  }
  if ((i % 2) != 0) {
   printf("\n");
   nos--;
  }
 }
 return 0;
}
Program:
/*
    This can be seen as two right angle triangles sharing the same base
    which is modified by adding few extra shifting spaces
*/
#include
// This function controls the inner loop and the spacing
// factor guided by the outer loop index and the spacing index.
int triangle(int nos, int i) {
 char prnt = '*';
 int s, j;
 for (s = nos; s >= 1; s--) {    // Spacing factor
  printf("  ");
 }
 for (j = 1; j <= i; j++) {      //The inner loop
  printf("%2c", prnt);
 }
 return 0;
}

int main() {
 int i, nos = 5;
 //draws the upper triangle
 for (i = 1; i <= 4; i++) {  triangle(nos, i);    //Inner loop construction  nos++;              // Increments the spacing factor  printf("\n");  } nos = 7;  //Draws the lower triangle skipping its base. for (i = 3; i >= 1; i--) {
  int j = 1;
  triangle(nos, i);  // Inner loop construction
  nos = nos - j;     // Spacing factor
  printf("\n");
 }
 return 0;
}
Program:
#include

int main() {
 char prnt = '*';
 int i, j, k, s, nos = -1;
 for (i = 5; i >= 1; i--) {
  for (j = 1; j <= i; j++) {  printf("%2c", prnt); } for (s = nos; s >= 1; s--) {
   printf("  ");
  }
  for (k = 1; k <= i; k++) {
   if (i == 5 && k == 5) {
    continue;
   }
   printf("%2c", prnt);
  }
  nos = nos + 2;
  printf("\n");
 }
 nos = 5;
 for (i = 2; i <= 5; i++) {
  for (j = 1; j <= i; j++) {  printf("%2c", prnt); } for (s = nos; s >= 1; s--) {
   printf("  ");
  }
  for (k = 1; k <= i; k++) {
   if (i == 5 && k == 5) {
    break;
   }
   printf("%2c", prnt);
  }
  nos = nos - 2;
  printf("\n");
 }
 return 0;
}
Program:
#include
int main() {
 char prnt = '*';
 int i, j, k, s, sp, nos = 0, nosp = -1;
 for (i = 9; i >= 3; (i = i - 2)) {
  for (s = nos; s >= 1; s--) {
   printf("  ");
  }
  for (j = 1; j <= i; j++) { printf("%2c", prnt); } for (sp = nosp; sp >= 1; sp--) {
   printf("  ");
  }
  for (k = 1; k <= i; k++) {  if (i == 9 && k == 1) { continue; } printf("%2c", prnt); } nos++; nosp = nosp + 2; printf("\n"); } nos = 4; for (i = 9; i >= 1; (i = i - 2)) {
  for (s = nos; s >= 1; s--) {
   printf("  ");
  }
  for (j = 1; j <= i; j++) {
   printf("%2c", prnt);
  }
  nos++;
  printf("\n");
 }

 return 0;
}
Program:
#include
/*
 * nos = Num. of spaces required in the triangle.
 * i   = Counter for the num. of charcters to print in each row
 * skip= A flag for checking whether to
 *       skip a character in a row.
 *
 */
int triangle(int nos, int i, int skip) {
 char prnt = '*';
 int s, j;
 for (s = nos; s >= 1; s--) {
  printf("  ");
 }
 for (j = 1; j <= i; j++) {
  if (skip != 0) {
   if (i == 4 && j == 1) {
    continue;
   }
  }
  printf("%2c", prnt);
 }
 return 0;
}

int main() {
 int i, nos = 4;
 for (i = 1; i <= 7; (i = i + 2)) {
  triangle(nos, i, 0);
  nos--;
  printf("\n");
 }
 nos = 5;
 for (i = 1; i <= 4; i++) { triangle(1, i, 0); //one space needed in each case of the formation triangle(nos, i, 1); //skip printing one star in the last row. nos = nos - 2; printf("\n"); } nos = 1; for (i = 3; i >= 1; i--) {
  triangle(1, i, 0);
  triangle(nos, i, 0);
  nos = nos + 2;
  printf("\n");
 }
 nos = 1;
 for (i = 7; i >= 1; (i = i - 2)) {
  triangle(nos, i, 0);
  nos++;
  printf("\n");
 }
 return 0;
}
Program:
#include

/*
 * nos = Num. of spaces required in the triangle.
 * i   = Counter for the num. of characters to print in each row
 * skip= A flag for check whether to
 *       skip a character in a row.
 *
 */

int triangle(int nos, int i, int skip) {
 char prnt = '*';
 int s, j;
 for (s = nos; s >= 1; s--) {
  printf("  ");
 }
 for (j = 1; j <= i; j++) {  if (skip != 0) {  if (i == 9 && j == 1) {    continue;  }  } if (i == 1 || i == 9) {  printf("%2c", prnt); } else if (j == 1 || j == i) {  printf("%2c", prnt);  } else {  printf("  "); }  } return 0; } int main() { int i, nos = 0, nosp = -1, nbsp = -1; for (i = 9; i >= 1; (i = i - 2)) {
  triangle(nos, i, 0);
  triangle(nosp, i, 1);
  triangle(nbsp, i, 1);
  printf("\n");
  nos++;
  nosp = nosp + 2;
  nbsp = nbsp + 2;
 }
 nos = 3, nosp = 5, nbsp = 5;
 for (i = 3; i <= 9; (i = i + 2)) {
  triangle(nos, i, 0);
  triangle(nosp, i, 1);
  triangle(nbsp, i, 1);
  printf("\n");
  nos--;
  nosp = nosp - 2;
  nbsp = nbsp - 2;
 }
 return 0;
}
How to Unlock Huawei and ZTE HSDPA Modems ?
1. Unlock Huawei HSDPA modems

i. Paste this below address to your address bar.
ii. Now replace your Huawei modem IMEI number with your IMEI number like below
iii. Press Enter key,after you will see like this
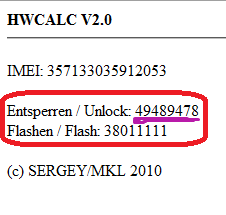
iv. Now enter this unlock code when it ask the code. you are done.
2 . Unlock ZTE HSDPA modems

Some ZTE modems not asking unlock code.so no where to input our code.
so you can't do it like above method.you have to use some software for this.
Download software click here
i. First of all, if you use some memory card, remove it. remove sim card
and put sim card what you want to unlock.(it will display invalid sim)
ii.Plug your modem in to your computer,sometime connection manager will display,close it.
iii. Unzip what you download and open dccrap.exe

iv. First select the manufacture as ZTE datacards ( No: 1)
v. Select the model as Auto detect (recommended) (No : 2 ) If you know the model and
which com port you use.u can do that way also
vi. Click find button (No: 3) . after your modem model will display below box
vii. After detect modem click unlock button (No: 4 )
cheers you are done.After few seconds modem will unlock restart your computer and use your modem.

i. Paste this below address to your address bar.
http://bb5.at/huawei.php?imei= your Huawei modem IMEI number
ii. Now replace your Huawei modem IMEI number with your IMEI number like below
http://bb5.at/huawei.php?imei=357133035912053
iii. Press Enter key,after you will see like this
iv. Now enter this unlock code when it ask the code. you are done.
2 . Unlock ZTE HSDPA modems

Some ZTE modems not asking unlock code.so no where to input our code.
so you can't do it like above method.you have to use some software for this.
Download software click here
i. First of all, if you use some memory card, remove it. remove sim card
and put sim card what you want to unlock.(it will display invalid sim)
ii.Plug your modem in to your computer,sometime connection manager will display,close it.
iii. Unzip what you download and open dccrap.exe

iv. First select the manufacture as ZTE datacards ( No: 1)
v. Select the model as Auto detect (recommended) (No : 2 ) If you know the model and
which com port you use.u can do that way also
vi. Click find button (No: 3) . after your modem model will display below box
vii. After detect modem click unlock button (No: 4 )
cheers you are done.After few seconds modem will unlock restart your computer and use your modem.
Convert FAT or FAT32 Volume to NTFS - Windows 7
1. To Use a Command Prompt at BootThat's it,3. In the command prompt, type convert drive letter: /fs:ntfs and press Enter. (See screenshot below)
A) In the command prompt, type diskpart and press Enter. (see screenshot below)
B) In the command prompt, type list volume and press Enter. (see screenshot below)
NOTE: This will let you see what the drive letter is for the drive that you want to connvert since it may not always be the same drive letter that it is in Windows.
C) After making note of the drive letter, type exit and press Enter. (see screenshot below)C) Continue on to step 3 to convert the drive.
NOTE: Substitute drive letter for the drive letter of the FAT or FAT32 drive or partition that you want to convert to NTFS. For example, I want to convert my USB flash key with the drive letter G: , so I would type convert g: /fs:ntfs and press enter.4. If prompted to Enter current volume label for drive (drive letter) (ex: G: ), then enter the name (ex: NEW VOLUME) of this drive letter as it is displayed in the Computer window and press Enter. (see screenshots below)
5. When the conversion to NTFS is complete, you receive the Conversion complete message. (See screenshot above)
NOTE: This may take a while to convert depending on full and large the drive is. It may also seem like it has hung at points, but be patient and let it finish.
6. Close the command prompt.
NOTE: If you used a command prompt at boot, then also close the System Recovery Options window and restart the computer.


How to Create Your Own Customized Run Commands
 The Run command on Microsoft Windows operating system allows you to directly open an application or document with just a single command instead of navigating to it’s location and double-clicking the executable icon. However, it only works for some of the inbuilt Windows programs such as Command prompt (cmd), Calculator (calc) etc.
So, have you ever wondered how to create your own customized Run commands for accessing your favorite programs, files and folders? Well, read on to find out the answer.
Creating the Customized Run Command:
Let me take up an example of how to create a customized run command for opening the Internet explorer. Once you create this command, you should be able to open the Internet explorer just by typing ie in the Run dialog box. Here is how you can do that.
- Right-click on your Desktop and select New -> Shortcut.
- You will see a “Create Shortcut” Dialog box as shown below

- Click on “Browse”, navigate to: Program Files -> Internet Explorer from your Root drive (usually C:\) and select “iexplore” as shown in the above figure and click on “OK”.
- Now click on “Next” and type any name for your shortcut. You can choose any name as per your choice; this will be your customized “Run command”. In this case I name my shortcut as “ie“. Click on “Finish”.
- You will see a shortcut named ie on your desktop. All you need to do is just copy this shortcut and paste it in your Windows folder (usually “C:/Windows”). Once you have copied the shortcut onto your Windows folder, you can delete the one on your Desktop.
- That’s it! From now on, just open the Run dialog box, type ie and hit Enter to open the Internet Explorer.
In this way you can create customized Run commands for any program of your choice. Say ff for Firefox, ym for Yahoo messenger, wmp for Windows media player and so on.
To do this, when you click on “Browse” in the Step-3, just select the target program’s main executable (.exe) file which will usually be located in the C:\Program Files folder. Give a simple and short name for this shortcut as per your choice and copy the shortcut file onto the Windows folder as usual. Now just type this short name in the Run dialog box to open the program.
I hope you like this post! Pass your comments.


